

"The Rose"
Some say love, it is a river
That drowns the tender reed.
Some say love, it is a razor
That leaves your soul to bleed.
Some say love, it is a hunger,
An endless aching need.
I say love, it is a flower,
And you its only seed.
It's the heart afraid of breaking
That never learns to dance.
It's the dream afraid of waking
That never takes the chance.
It's the one who won't be taken,
Who cannot seem to give,
And the soul afraid of dyin'
That never learns to live.
When the night has been too lonely
And the road has been too long,
And you think that love is only
For the lucky and the strong,
Just remember in the winter
Far beneath the bitter snows
Lies the seed that with the sun's love
In the spring becomes the rose.
Bette Midler
This tutorial was written by me on October 2nd, 2012. Any resemblance to any other tutorial or tag is unintentional and is pure coincidence. Please do not claim my work as your own and do not post to any other website, blog or forum without permission from me. It is written with the assumption that you have a working knowledge of PSP and its components. It was written for PSP 9.
I recommend that you read through this or any tutorial you are attempting before starting it so you will know what to expect and how to get organized.
As with any of my tutorials when a plugin is required, change only the settings I recommend and leave the others on the default settings.
What you will need to accomplish this tutorial is this stunning kit by TootyPup Scraps called Behind the Mask of Love HERE at Designer Scraps. The timeless art of Mr. Keith Garvey which you can purchase at his site HERE. Please support the arts and do not use Keith's tubes without a license and certainly do not share his tubes or this kit. Plugins are Xero, Alien Skin Eye Candy 5/Impact, Eye Candy 4000 and Toadies. Animation is by Lovey which you can find on her site HERE. She doesn't have a display for it on her page there but it's in one of the downloads for that page for September 2010, it's called Pink Sparkle Puff. There is no mask as we will make our own background. Font is Cadeaulx, it's an Auto FX font and can be downloaded HERE with their font collection.
Let's do this...
First start a new 700 x 700 white image, we'll resize in the end. Draw a black ellipse in the middle of your canvas...see my image for reference. Copy and paste Rose Deco 04 above this layer and then flip it. Duplicate it and then use your Raster Deform tool to rotate it to the left or right nearly 90 degrees, duplicate and mirror it. The rose at the bottom middle should be above the other two. Then using your selection tool with a feather of about 70% select and clear the netting to expose the other roses.
Now copy and paste Rose Vine 01 over these roses and use your Raster deform tool to 'tweak' them around your arrangement. With this tool you can tweak anything by rotating and resizing..perfect for precise sizing. Merge all your roses layers together in your layer palette.
Copy and paste the ribbon above the roses, flip and mirror it and then copy and paste one beneath the rose layers. This makes the ribbon appear to be winding through the roses.
At this point select your black ellipse and then flood fill it with a light pink from the larger roses. Leave it selected and copy and paste the rose vine element into it, scatter it about and then go to Selection/Invert and hit delete to clear any of it outside the ellipse. Then go to Effects/Art Media Effects/Brush strokes and use these settings:

Now duplicate your ellipse and on the original go to Effects/Plugins/Toadies/Blast em and use these settings:

Then go right back to Effects/Plugins/Toadies/Blur em and use these settings:

Go up to the duplicated ellipse layer in your layer palette and go to Effects/Plugins/Eye Candy 4000/Corona and use these settings:

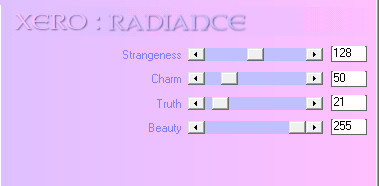
Copy and paste your tube above this and size her to fit nicely into your design. Then go to Effects/Plugins/Xero/Radiance and use these settings:
Then to make her more dimensional let's give her a perspective shadow. Go to Effects/Plugins/Alien Skin Eye Candy 5/Impact/Perspective Shadow and use these settings:

This plugin may require a little practice. There are just a couple of important things to remember when shadowing is to attempt to make your shadows appear natural and to watch closely all the areas of whatever you're shadowing. You can view all the areas by moving the little red box around at the top of the window of this plugin...
(You can tweak your shadows by moving the nodes around in the preview window. To move one node at a time hold down your CTRL key. You can move the whole shadow by holding down your right mouse button and clicking in the middle of the shadow. It's very important to think about how a shadow would be cast realistically and how dark or how light it should be. This plugin is one of my favorites and one I use with nearly every single one of my tags.)
For the flowers in the background select a small portion of one of the rose vines, be sure your Selection tool has a feather...

Paste above your background layer and resize it about 150%, take the opacity down to 60% and apply the same brush stroke effect as you did above by going to Effects/Art Media Effects/Brush Strokes. Scatter a few around and use your Raster Deform tool to rotate them in different directions. Select the smaller rose with some vine attached and follow the same steps.
For your name go to Effects/Plugins/Eye Candy 4000/Bevel Boss and use these settings:

Give it a slight drop shadow and then apply the Toadies plugins using the same settings you used above...ie, Blast em and Blur em.
Add your copyright and we'll get ready to add the animation. For a neat and professional-looking copyright I use a pixel, copy or ceriph font. You can google and find literally hundreds of these fonts. Most of them look best at size 6 with your Antialias set to Off. NOTE: for crisp edges on your normal fonts set your Antialias to Sharp.
Hide all the layers from your tube up and then merge visible. Unhide the hidden layers, hide the merged layers and then merge visible. Note: if you're going to make tags for others, make sure your name has it's own layer and when merging visible layers make sure it's hidden as to not be in any of the merged layers.
Now open Animation Shop (AS)...File/Jasc Software Products/Launch Animation Shop and go back to PSP. Hide the top merged layers and then hold down CTRL + SHIFT and hit C to copy merged then go to AS. In AS hold down CTRL and hit v to paste a new animation. Open Lovey's animation into AS and note that it has 16 frames, therefore what we are going to paste this animation into must have 16 frames as well. So click on top of the frame you just posted into AS and go down to Duplicate Selected enough times to have 16 frames. If you make too many just click on the extra frames and hit delete.
At this point to make the animation fit at the right size resize your animation to 625 x 625 and then drag the slide bar at the bottom all the way to the left so you are seeing the very first frame and then go to Edit/Select All ( CTRL + A ). Be sure that Lovey's animation has the slide bar all the way to the left and that all the frames are selected. Now clicking on the first frame drag Lovey's Animation into your's about the middle top part of the Ellipse shape and let go.
Go back to PSP, hide the bottom merged layers and unhide the top merged layers and your name and hold down CTRL + SHIFT and hit C to copy merged and go back to AS. Remember we are working with 16 frames so this must also have 16 frames. Click on the top of this newly pasted frame and go down to Duplicate Selected enough times to have 16 frames. Resize this to 625 x 625, make sure the slider bar at the bottom is all the way to the left...same for the working animation we've been working on..slider bar all the way to the left and all frames selected. Now drag the first frame of the last animation you pasted and duplicated into the first frame of the animation we've been working on. Take care that all things are lined up properly before you let go. If you mess up, it's ok, just go to Edit/Undo Drag and repeat.
I'm glad you tried my tutorial, I hope you had fun with it and maybe learned something to hone your skills. Please feel free to contact me with any questions or issues about any of my tutorials.
Blessings,
Trese
No comments:
Post a Comment