
This tutorial was written by me on April 12th, 2012. Any resemblance to any other tutorial or tag is unintentional and is pure coincidence. Please do not claim my work as your own and do not post to any other website, blog or forum without permission from me. It is written with the assumption that you have a working knowledge of PSP and its components. I wrote it for PSP 9, but it should be compatible with most versions.
I recommend that you read through this or any tutorial you are attempting before starting it so you will know what to expect and how to get organized.
As with any of my tutorials when a plugin is required, change only the settings I recommend and leave the others on the default settings.
What you will need to accomplish this tutorial is this rocking kit by Foxy's Designz called Emo Is Evil which you can purchase at her store Digi Fox's Studio HERE. Art by the amazing Joan Pelaez which you can purchase at Creative Design Outlet HERE. Please support the arts and do not use Joan's tubes without a license. Mask WSL_Mask 84 is by Weescotclass which you can find HERE along with all of her other masks. Plugins Eye Candy 4000 and Penta. Fonts are Ekaterina Velkaya HERE and Zreaks NFI HERE.
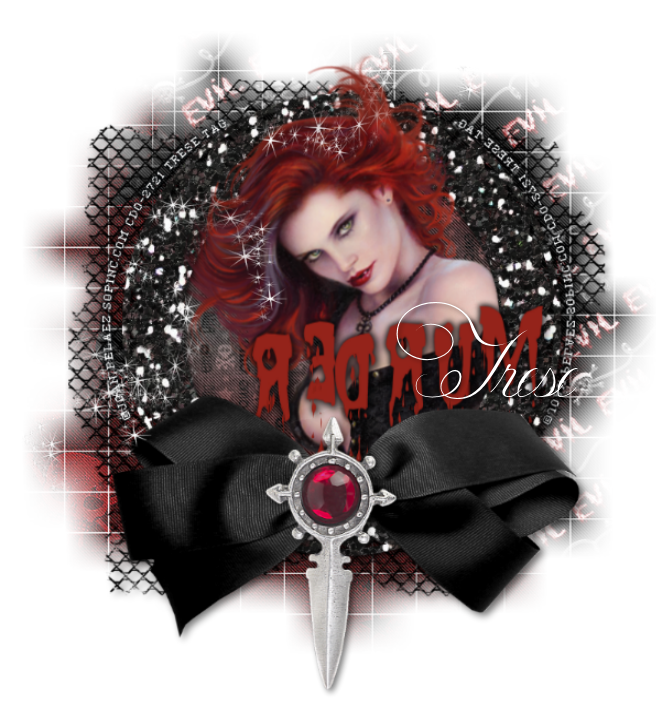
First of all, put your mask into your PSP mask folder. Open your elements and tube into PSP. You can use my image as a reference for which ones to use. Start a 700 by 700 new white image. We will resize later. Copy and paste element 27 into your new image that I will refer to as your 'working' image from here. Using your Raster Deform tool resize this frame to fit centrally into your working image. Add a drop shadow using these settings: Vertical and Horizontal Offsets 4, Opacity 43 and Blur 14.
Next copy and paste your tube beneath your frame. Resize to fit using your Raster Deform tool. I use this tool on every single one of my tags. It's perfect for getting precise sizing and eliminates distortion depending how large or small you go. Duplicate your tube layer and drag that layer above your frame layer. Using your eraser tool erase the lower parts of the tube. Now she looks like her head is popping out of the frame.
Copy and paste paper 5 above your background layer. Resize 75% and then erase the areas of the paper outside the frame. Go to Effects/Plugins/Penta/Jeans and use these settings: Amount 62, Border Width 4.
Beneath this paper layer copy and paste the mesh wire, resize to fit with your Raster Deform tool and add the same drop shadow as we used on the frame.
Copy and paste paper 2 beneath this wire mesh frame, resize 75% and add your mask...WSL_Mask 84 then move this mask layer to the upper right of your working image...use my image for reference for placement. Do the same for paper 4 only move it to the bottom left. On each of these papers add the same Penta/Jeans plugin.
Copy and paste the bow and the knife, resize and add same drop shadow as we used earlier.
Now the wordart. Using the font Zreaks NFI, spell out the word murder. Only use one letter at a time. Mirror each letter and put them loosely together to sort of appear that the word was written sloppily with a finger or brush. Merge those letters together and add a Corona by going to Effects/Plugins/Eye Candy 4000/Corona using these settings: Glow Width 7, Flare size 14, Stretch 100, Waver 23, Blur 52, Overall Opacity 100, Color is Black, and check Draw Only Outside Selection.
Add your name with the font Ekaterina Velkaya and add the same drop shadow only changing the Vertical and Horizontal Offsets to 2.
Now for the copyright this is what I done. I used my preset ellipse tool. On my color pallet I made the bottom color transparent and the top color white...you want to use a color you can see well. The line style is solid and the size is 3. I also set my mode to circle and drew a circle around my frame just a bit of a ways from the edges. I drew this circle a layer above the mesh wire layer. Selected my text tool and resized as I needed for precise sizing around my frame. Left as a vector layer. Then I added a layer and on the right side of my circle I'd just drawn I typed my copyright. If you will hover over a preset circle with your text tool it will change from the normal 'A' to and 'A with a semi circle beneath it.' Click on your preset circle and you can type around the circle. I use a pixel font for my copyrights set to size 6. You can google pixel for copy fonts and find all kinds. Most of them won't pixelate at six 6 or 8. Normally you want to be sure your antialias is set to off, but for some reason and I'm not sure why, adding a pixel font to a preset shape will distort it if your antialias is off. I set mine to sharp and it looks better. Apply your copyright, change to a raster layer, deleted the new layer and the preset circle. Then I copied my copyright and mirrored it and set it to the other side of my circle, added a smaller Corona size 3 with the same settings as we used above and added a slight drop shadow to them both.
Resize to your desired size and you're done.
Thank you for doing my tutorial. I hope you gleaned something from it to hone your PSP skills. Please contact me with any questions or issues with broken links.
Blessings, Trese
No comments:
Post a Comment