
This tutorial was written by me on April 28th, 2012. Any resemblance to any other tutorial or tag is unintentional and is pure coincidence. Please do not claim my work as your own and do not post to any other website, blog or forum without permission from me. It is written with the assumption that you have a working knowledge of PSP and its components. I wrote it for PSP 9, but it should be compatible with most versions.
I recommend that you read through this or any tutorial you are attempting before starting it so you will know what to expect and how to get organized.
As with any of my tutorials when a plugin is required, change only the settings I recommend and leave the others on the default settings.
What you will need to accomplish this tutorial is this sweet scrap kit by the wonderfully talented Schnegge. It's free to use and you can download it HERE. The gorgeous art of Sara Butcher. You can purchase her tubes at Creative Design Outlet HERE. Please support the arts and DO NOT use her tubes without a license. One of my masks Trese Mask0029 which you can find right here on my blog. Font of choice, I'm using Ahoy September Rain, which is a pay font, but you can use anything which looks whimsical. And plugins AlienSkin Eye Candy 5/Impact and Eye Candy 4000.
Ready? Let's get started...
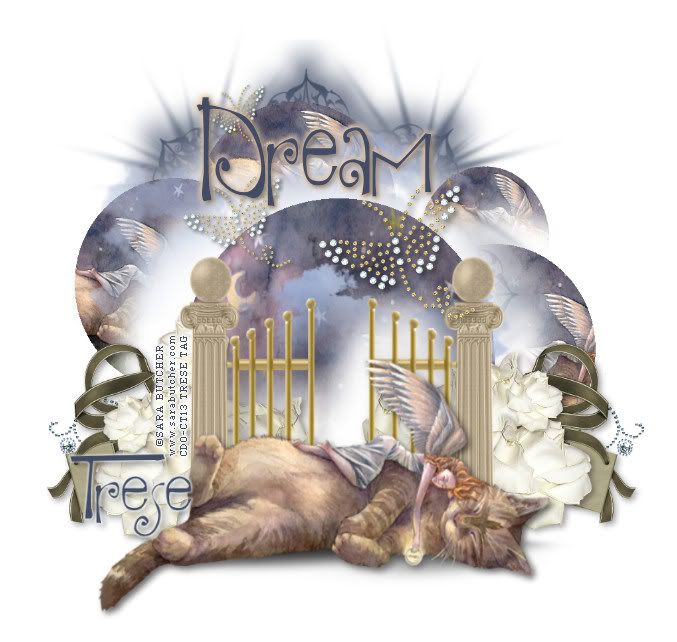
First off you will need to put your mask in your PSP mask folder. Using my image as a reference, open your elements from your kit into PSP as well as your tube. (Isn't this just the most adorable tube you've ever seen?)
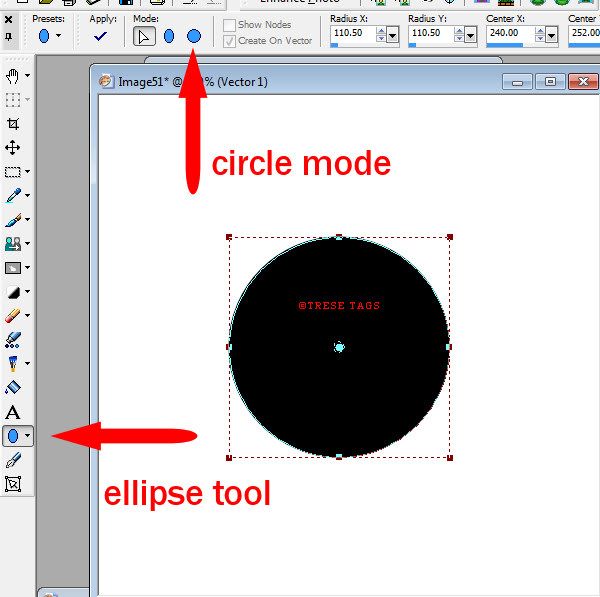
Now start a new 700 x 700 white image. You can resize when you're done. Begin by creating a circle with your ellipse tool with the mode set on circle.
Convert your circle layer to a raster layer then select it with your magic wand. Copy and paste the picture image from your tube. (There is two images with this tube...the tube and the whole picture image.) You may need to resize the picture image a bit. If so, when you copy and paste it resize it first then select your circle with your magic wand once it fits into the circle. Once you have selected your circle, be sure you are on your picture image layer, go up to Selection/Invert and hit delete. This will delete anything that is outside the circle. Do this several times, only making each circle different sizes...once again, you can use my image as a reference for sizes and placement of your circles. The rest of your circles should be beneath the original circle.
Once you have done all of your circles and placed your images over them delete the circles. Now you will select your selection tool, set your feather to 75%. On the first circle image select part of the bottom and delete it. Do this on the rest of them but you want to delete the areas that will make it appear as though there is a halo around the larger original circle image and around those that overlap. Use my image as a reference.
Next, select a darker color from your image circles. Above the background layer add a layer and flood fill with this color. Apply Trese Mask0029. You will notice that this color is now filling the white areas you deleted on your circles...Simply select those areas with your Selection tool with the same Feather setting and delete these parts of the mask.
Now you will copy and paste all of your elements from the kit. Resize them using your Raster Deform tool. You will find resizing like this instead of in percentages will not distort your elements or tubes. Give each a slight drop shadow. For the bows in the kit I colorized them to match my design better. This is done by going to Adjust/Hue and Saturation/Colorize. Once again, use my image as a reference for size and placement.
For the gate's shadow go to Effects/Plugins/Alien Skin Eye Candy/Impact/Perspective Shadow. This plugin takes some practice but is a very cool and useful plugin for any design. What I want you to do is practice with it so I'm not giving you settings. There are basically two main things you need to know about this plugin...the nodes and the red box. With the nodes you can manipulate your shadow any way you want and the red box allows you to view all areas of whatever you're shadowing.
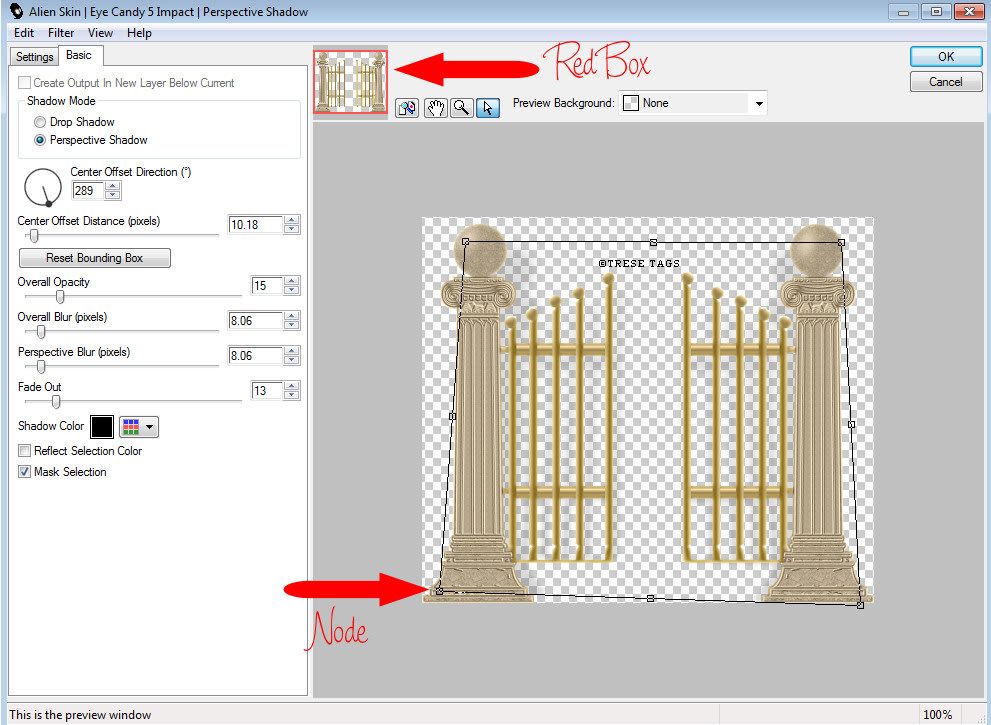
In the settings tab you will find multiple sorts of shadows or reflections, any of which can be manipulated moving your nodes around. You can move one node at a time by holding down your Ctrl key while moving the node with your mouse. With the red box if the entire tube isn't in the display window you can drag the red box to view any area not displayed. It's very important to make your shadows look natural. This is why you need to pay special attention to all areas of whatever you're shadowing and being sure your shadow isn't too dark or too light and that your shadow falls naturally. Simply think about how a shadow would look and manipulate your nodes until this happens. For a darker design, your shadow should appear darker and vice versa for a lighter design.
Now, copy and paste your tube placing it beneath the gate. Use your perspective shadow on it casting a darker shadow beneath the cat. Remember you can drag your nodes and up your opacity to make the shadow darker.
We're almost done. For the wordart and your name go to Effects/Plugins/Eye Candy 4000/Corona and add a slight Corona around each. Add your copyright. For a professional looking copyright I use Pixel or Copy fonts. You can google and find them all over the net. Most of these fonts will not pixelate if used at size 6 with your antialias set to off. For the copyright symbol hold down your ALT key and hit 0169. Resize to fit your needs and save.
Thank you for trying my tutorial, I hope you learned something useful to hone your PSP skills. Please do not hesitate to contact me with questions or to inform me of broken links. Happy creating...
Blessings, Trese
No comments:
Post a Comment