

Salt Water
This tutorial was written by me on August 26th, 2012. Any resemblance to any other tutorial or tag is unintentional and is pure coincidence. Please do not claim my work as your own and do not post to any other website, blog or forum without permission from me. It is written with the assumption that you have a working knowledge of PSP and its components. It was written for PSP 9.
I recommend that you read through this or any tutorial you are attempting before starting it so you will know what to expect and how to get organized.
As with any of my tutorials when a plugin is required, change only the settings I recommend and leave the others on the default settings.
What you will need to accomplish this tutorial is this awesome kit by Amy Marie Kits called Sea Life which you can purchase HERE. Thank you Amy I enjoyed working with this beautiful kit packed full of charming nautical elements. The bewitching art of Kurama Phoenix which you can purchase at Creative Design Outlet HERE. Please support the arts and DO NOT use Kurama's tubes without a license and please don't share her tubes or this kit. Plugins are Eye Candy 4000, Alien Skin Eye Candy 5/Impact and Xero. Mask is one I got through one of my yahoo groups a long time ago. Please if this is your mask let me know so I can give you credit here. You can download the mask HERE. Fonts are Ahoy Cabin Boy and Elephant. Ahoy Cabin Boy is a commercial font, you can find information on it HERE. Elephant font you can download HERE.
Let's get started...
First start a new 700 x 700 white image. You can resize later. Copy and paste el066, your frame, into it. Then copy and paste your tube below your frame. Duplicate your tube and drag the duplicate above your frame. Use your eraser tool to erase to bottom left part of the tube outside the frame then erase the same part of the original tube to fit her inside the frame.
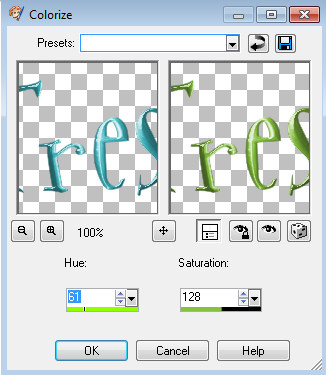
Copy and paste pp0010 above your background layer. Resize your paper 60% and then again use your eraser tool to erase areas of the paper outside the frame. Then go to Adjust/Hue & Saturation/Colorize and use these settings:

Beneath this paper layer draw a large black circle with your preset tool. Then go back to your paper layer and set the Blend Mode to Hard Light.
Using my image as a reference begin to copy and paste the remaining elements into your working canvas. I normally use my Raster/Deform tool for precise resizing. It also nearly eliminates distortion or pixelization of what I'm resizing versus resizing in percentages depending how large or how small you go.
For the elements you want to have more depth in your image you need to add Perspective Shadow. You can accomplish this by going to Effects/Plugins/Alien Skin Eye Candy 5/Impact/Perspective Shadow and use these settings:

This plugin can take some practice for some people. I personally had to practice quite a bit with it. The secret to this plugin is to watch all areas of what you're shadowing and to think about how a shadow would be cast naturally.
(You can tweak your shadows by moving the nodes around in the preview window. To move one node at a time hold down your CTRL key. You can move the whole shadow by holding down your right mouse button and clicking in the middle of the shadow. It's very important to think about how a shadow would be cast realistically and how dark or how light it should be. This plugin is one of my favorites and one I use with nearly every single one of my tags.)
Sometimes you can add a normal drop shadow to your element as well, depending on what you're wanting to accomplish.
At this point, copy and paste a paper above your background layer. Resize it 80%. I used pp0013. Apply your mask, merge group and then duplicate, mirror and flip your mask, mirror and flip it again. Merge the two mask layers together and use your Raster Deform tool to 'tweak' it...i.e, resize...move it around, etc. Then go to Effects/Art Media Effects/Brush Strokes and use these settings:

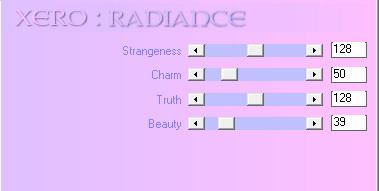
At this point hide your background layer and merge the visible layers. On your merged layer go to Effects/Plugins/Xero/Radiance and use these settings:
Now we're going to make the circular wordart...easy peasy. Use your Preset Ellipse tool set on Circle. Set your background Fill tool to transparent and the foreground Fill tool to a bright color, or just a color you can easily see. Set the Line Style to Solid with a Width of 1 and draw a circle around your frame with just a little bit of space outside the frame. Add a new Raster Layer above this preset circle layer then grab your Text tool and hover to near the top of the circle until you see like a 'smiley face looking icon' below the A. Then click on the circle and type your words. When you have your words where you want them, apply your text and then convert it to a Raster layer, delete the new layer you added and then delete the preset circle.
Now add your name. Go to Effects/Plugins/Alien Skin Eye Candy 5/Chrome and use these settings:

Now go to Adjust/Hue & Saturation/Colorize and use these settings:

Duplicate your name...be careful once you duplicated not to move your name at all. On the duplicated layer go back to Adjust/Hue & Saturation/Colorize, but use these settings this time:
On the same 2nd colorized name layer grab your Selection tool with a feather of about 50 set to Ellipse and select small areas of this layer and hit delete a time or two to clear some of the green exposing the blue layer beneath. Once you have the effect you want, merge the two name layers together and add a slight drop shadow. I used these drop shadow settings:

Now add your copyright and you're done. Be sure you copyright is legal and legible. For a neat and professional-looking copyright I use a pixel for copy font...some of these are also known as a Ceriph font. You can google and find hundreds of these fonts. Most work well at size six with your antialias set to off. Note: For crisp edges with a normal font, set your Antialias to Sharp.
I'm glad you tried my tutorial. I hope you enjoyed it and maybe gleaned something from it to hone your PSP skills. Please feel free to contact me with any questions you have about any of my tutorials or certainly with any issues of broken links, etc.
Blessings,
Trese
No comments:
Post a Comment