

This tutorial was written by me on May 16th, 2012. Any resemblance to any other tutorial or tag is unintentional and is pure coincidence. Please do not claim my work as your own and do not post to any other website, blog or forum without permission from me. It is written with the assumption that you have a working knowledge of PSP and its components. I wrote it for PSP 9, but it should be compatible with most versions.
I recommend that you read through this or any tutorial you are attempting before starting it so you will know what to expect and how to get organized.
As with any of my tutorials when a plugin is required, change only the settings I recommend and leave the others on the default settings.
What you will need to accomplish this tutorial is this fun and wacky scrap kit by Foxy's Designz called Drama Bitches. You can purchase this kit from her store Digi Fox's Studio HERE. This spunky tube from Ed Mironiuk which you can purchase at Creative Design Outlet HERE. Please support the arts and do not use Ed's tubes without a license to do so. Mask by me which you can find right here on this blog...Trese Mask0095. Plugins Alien Skin Eye Candy 5/Impact and Eye Candy 4000. Fonts are Oliver which you can download HERE and Speedball No. 3 that can be found HERE.
Let's begin...
First open all of your elements and your tube into PSP. You can use my image as a reference. Now start a new 700 x 700 white image. We will resize later. Copy and paste element 8 into your new white image. Resize 65% and go up to Adjust/Hue & Saturation/Colorize and use the following settings:

Add a slight drop shadow to this element.
Next, copy and paste paper 11 beneath this layer and resize it 50%. Using your eraser tool erase any areas of the paper outside the circle of the element above it.
Now, copy and paste paper 6 above your background layer and apply your mask. You can always use your Raster Deform tool to resize for precise sizing.
Next, copy and paste element 25 above the colorized circle. Use your Raster Deform tool to resize it if needed to fit. Go to Effects/Plugins/Alien Skin Eye Candy 5/Perspective Shadow and use these settings:

Now add a layer above this layer and name it 'blue dots.' Grab your Selection tool set it to 'circle' with a 3 feather. Draw a small circle over one of the blue dots on element 25 which I will now call 'bat.' See example below:

(NOTE: I didn't fill the dots close to the skeleton of the bat)
Flood fill with the neon green from the dots below the blue dots. You may have to fill it several times in order to cover the dot entirely. Do this for every third dot only on the blue dots. Once you have finished filling the blue dots with the green add another layer and name it 'green dots.' Do the same as you just did only fill the green dots with the neon pink and do every third dot. Once you have finished the green dots add another layer and name it 'pink dots.' Repeat the process filling the pink dots with the neon blue. Since there is an even number of colored dots, I chose to fill the purple dots with the neon green...you can choose any of the colors you wish to fill the purple dots.
Copy and paste the stars and the rabbit into your working canvas and give them a slight drop shadow.
Copy and paste your tube and give her the same Perspective shadow as you did the bat, only drag down the top node to about the top of the part in her hair.
For the wordart use the Oliver font and go to Effects/Plugins/Eye Candy 4000 and use the following settings:
COLOR TAB
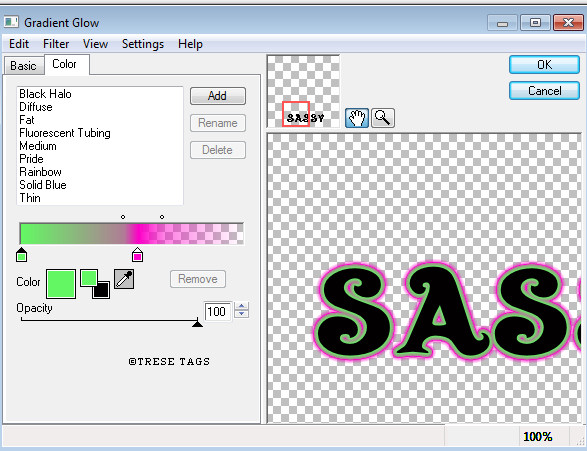
BASIC TAB

Then add a slight drop shadow.
For your name use Speedball No. 3 font and go to Effects/Plugins/Eye Candy 4000/Corona and use these settings: (set antialias to sharp for a crisp look of your font.)
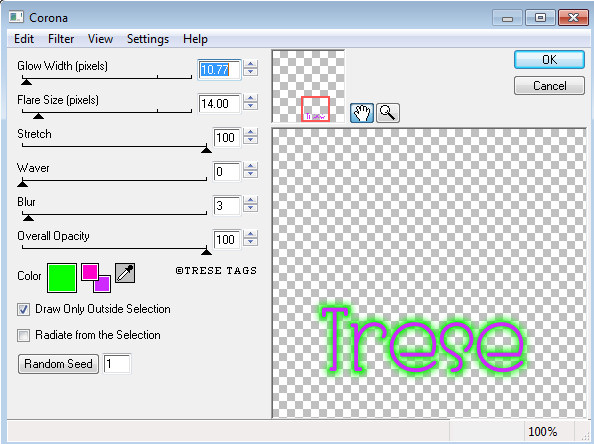
Add your copyright. For a neat and professional-looking copyright I use pixel or copy fonts. You can google and find them all over. These fonts work best at size 6 with your antialias set to off. I used the same Corona on my copyright only decreased the glow width to 5 and the color to black.
Now for the fun part...let's animate.
Hide all four layers of the colors you created on the dots. Hold down CTRL + SHIFT and hit C to copy merged and open Animation Shop. Once it's open hold down CTRL and hit v to paste a new animation and go back to PSP. Unhide your layer named 'blue dots' and copy merged just like you did above. Now go back to Animation Shop only this time while holding down CTRL + SHIFT hit L to paste after current frame. Back to PSP and hide the blue dots layer, unhide green dots layer and copy merged...back to Animation shop and paste after current frame just as you did above. Repeat this process for the remaining color layers. View your animation to be sure it looks right...View/Animation. Resize and save as a .gif and you're done.
I hope you enjoyed my tutorial and maybe learned something to hone your PSP skills. Please don't hesitate to contact me with any questions or concerns with broken links, etc. Happy creating.
Blessings,
Trese
No comments:
Post a Comment