

Haunting Beauty
This tutorial was written by me on September 9th, 2012. Any resemblance to any other tutorial or tag is unintentional and is pure coincidence. Please do not claim my work as your own and do not post to any other website, blog or forum without permission from me. It is written with the assumption that you have a working knowledge of PSP and its components. It was written for PSP 9.
I recommend that you read through this or any tutorial you are attempting before starting it so you will know what to expect and how to get organized.
As with any of my tutorials when a plugin is required, change only the settings I recommend and leave the others on the default settings.
What you will need to accomplish this tutorial is the gorgeous art of Anna Marine with this matching kit to go with it by Dee's Sign Depot which you can purchase at Creative Design Outlet HERE. Animation is by Lovey. You can download it HERE on her blog along with tons of other fun anis she has posted for us as well. Please leave her some love if you download and tell her I sent ya. Mask is one I got in one of my groups a long time ago and cannot find any information on it...it's Ziggy%20Edge%20Mask...if this mask is your creation, please let me know so I can give you credit here. I supplied it HERE. Plugins are Alien Skin Eye Candy 5/Impact, Eye Candy 4000 and Xero. Font is Donree's Claws which can be downloaded HERE.
Okay, let's do this..
First start a new 700 x 700 white image. We'll resize in the end. Copy and paste frame 2 into your new canvas, resize it 75%, move it to the left, duplicate and mirror it. Then add a slight drop shadow something like this example below to each of them...

Then below both of these frames copy and paste the tree element, resize it 85% and then go to Effects/Plugins/Alien Skin Eye Candy 5/Impact and use these settings:
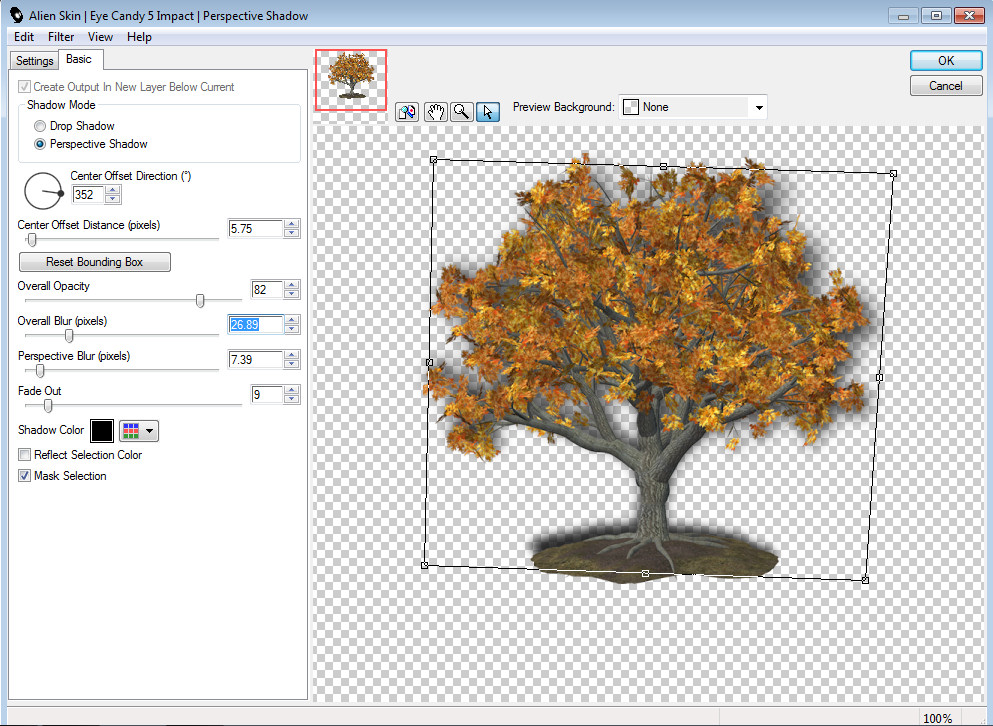
This plugin may require a little practice. There are just a couple of important things to remember when shadowing is to attempt to make your shadows appear natural and to watch closely all the areas of whatever you're shadowing. You can view all the areas by moving the little red box around at the top of the window of this plugin...
(You can tweak your shadows by moving the nodes around in the preview window. To move one node at a time hold down your CTRL key. You can move the whole shadow by holding down your right mouse button and clicking in the middle of the shadow. It's very important to think about how a shadow would be cast realistically and how dark or how light it should be. This plugin is one of my favorites and one I use with nearly every single one of my tags.)
I also applied this plugin to my two window frames for more depth.
Copy and paste paper 3 over your background layer, resize 65%, fit the paper in the frames so you can see the fence through the panes...see my image for reference...then delete any of the paper on the outside edges of the frames and on the top around the tree...and start copying and pasting the remaining elements...your work should start looking something like this..

Copy and paste the rest of your elements and your tube. You can use my image as a reference for size and placement. For precise sizing I use my Raster Deform tool (or Pick Tool in newer versions). It also prevents a lot of the distortion that happens when resizing in percentages. For the elements you want to have more dimension use the perspective shadow. Add a slight drop shadow on the spider webs and the spiders.
Now copy and paste your tube into your canvas and remember for precise sizing use your Raster Deform or Pick Tool. Once you have her sized and placed go to Effects/Plugins/Xero/Radiance and use these settings:

Give her a Perspective Shadow as well.
Now we are going to merge a few layers together. In your layer palette hide the layers from the very top down to your frames...hide the frames as well and then Merge Visible layers together. To add a little richer coloring add the same Radiance effect as you just did above.
Now hide these merged layers and unhide the hidden layers and then merge all of them together and if you wish add the Radiance effect to them as well.
For your name type it and then go to Effects/Plugins/Eye Candy 4000/Bevel Boss and use these settings:
Bevel Profile Tab

Basic Tab

Now add a slight drop shadow and then go to Effects/Plugins/Eye Candy 4000/Corona and use these settings:

Now add your copyright taking care that it is legal and legible. For a neat and professional-looking copyright I use pixel, copy or ceriph fonts. You can google and find literally hundreds of these fonts. Most of them work best at size 6 with your antialias set to off...it prevents the font from pixelating. Note: for crisp edges on your fonts for your name, wordart, etc set your Antialias to Sharp.
Now we'll add this simple animation...Just a few easy steps. In your layer palette hide your name, copyright and the top merged layers and hold down CTRL + SHIFT + C to copy merged. Go to File/Jasc Software Products/Launch Animation Shop (AS). Once in AS hit CTRL + v to paste a new animation. Open the animation you downloaded from Lovey. Take note of how many frames Lovey's animation has. There is a black copyright frame you must delete and once that's deleted there are 30 frames.

Since the falling leaves animation has 30 frames our newly posted animation must have 30 frames as well. So click on the top of your animation and go down to Duplicate Selected, repeat this as many times as need to get thirty frames. If you duplicate too many frames just delete the extra frames by selecting them and hitting delete on your keyboard.
Now, very important step. Be sure the slider bar at the bottom of both of these animations...your's and Lovey's....are all the way to the left. Once you have your slider bars all the way to the left go up to Edit/Select All for both as well.
Once you have all frames selected for Lovey's falling leaves animation click on the top of the animation and go down to copy then hold down CTRL and hit v two or three times, you will need two of these animations, one for each window and it's a good idea to have extras in case you need them...you could mess up when dragging. I strongly suggest you have quite a few extra copies as you can't see the animation you're dragging. You have to view the animation by going to View/Animation and then try to guess where the leaves are going to fall...sort of hit and miss....
On one of the animations you need to mirror it, so be sure all frames are selected and go up to Animation/Mirror. Click on the very first frame of the falling leaves animation and drag it over into the very first frame of your animation and do not let you until you have it placed where you want it...be patient, it has 30 frames and it takes it a few seconds to drag over. Once you have the first dragged over check your work by going to View/Animation...if it appears to be where you want it to fit into your window, make sure all frames are still selected in your animation and then drag the mirrored falling leaves animation into the other area for the opposite window. Check your work. If you are unhappy with your drag, go to Edit/Undo drag and then redrag one of the extras...do this until you think the animation will fit nicely into the window frames.
Once you're happy with your two drags to back to PSP. Hide the bottom merged layers and unhide the top merged layers, your name and copyright and hold down CTRL + SHIFT + C to copy merged and then back to AS. Hit CTRL + v to paste a new animation. Duplicate this frame until you have thirty frames here as well. Remember all frames must always be selected and you must have your slider bar all the way to the left and you must drag the first frame into the first frame.
Check your animation...View/Animation. If you're happy with it, resize to fit your needs, save as a .gif and you're done.
I hope you enjoyed my tutorial and maybe learned something to help hone your skills. Please feel free to contact me with any questions you have about any of my tutorials. And please let me know of broken links, etc.
Blessings,
Trese
No comments:
Post a Comment