
This tutorial was written by me on September 11th, 2012. Any resemblance to any other tutorial or tag is unintentional and is pure coincidence. Please do not claim my work as your own and do not post to any other website, blog or forum without permission from me. It is written with the assumption that you have a working knowledge of PSP and its components. It was written for PSP 9.
I recommend that you read through this or any tutorial you are attempting before starting it so you will know what to expect and how to get organized.
As with any of my tutorials when a plugin is required, change only the settings I recommend and leave the others on the default settings.
What you will need to accomplish this tutorial is the artist bundle pack from Kurama Phoenix and Hungry Hill Scraps which you can purchase at Creative Design Outlet HERE. Supplies I have included HERE which is the mask and the brush. If this is your mask please let me know so I can give you credit here, I got it some time ago in one of my groups. Animation is by Lovey, you can download her anis from her blog HERE. This particular animation was in her September 2010 download. Please leave her some love when downloading her anis. Plugins are Alien Skin Eye Candy 5/Impact, Xero, Eye Candy 4000 and Toadies. Font is A&S Harliquin and it's a pay font which can be purchased HERE.
Let's get this started...
First we need to get your brushes into PSP for use. It's just a coupe easy steps. Open the files I provided into PSP. They're in .png format, you can also use .jpegs. For each brush go to File/Export/Custom Brush. Name your brushes and click Ok and they're installed in PSP ready for use.
Now start a new 700 x 700 white image, we'll resize in the end. Copy and paste Paper7 into your new canvas, resize 65% and apply the mask I supplied. Merge the group together. Copy and paste the close up tube included on top of your mask layer and resize it 125%. Go back to your mask layer and go to Selections/Select All/Selections/Float/Selections/Defloat and then Selections/Invert. Go back to the close up tube layer and hit delete. Selections/Select None.
In your layer palette set the blend mode for this close up tube to Hard Light.
Begin to copy and paste the other elements, use my image as a reference for size and placement. You don't have to place your flowers and foliage exactly like I have mine, just remember that nature does not grow symmetrically, it's wild and unpredictable and you should paste your's as such. For precise sizing of your elements use your Raster/Deform tool, in newer versions I think it's called the Pick tool. This tool also eliminates most of the pixelation and distortion that takes place when resizing in percentages.
You should begin with the elements closest to the mask and build from there...copy and paste the bracket clusters first...duplicate and mirror and place both to the left and right of your mask, then copy and paste the cloud element, resize it 60%, copy and paste your tube over this, then paste the cloud element again and resize it 75%.
Next add a new Raster Layer and name it brushes. Set your foreground color to white and apply the brushes...see my image. You can always tweak your brushes with your Raster Deform tool...ie, resize or rotate them. Then begin to stack the remaining elements on top of this.
For the butterflies I used a Corona to make them a little more prominent....go to Effects/Plugins/Eye Candy 4000/Corona and use these settings:

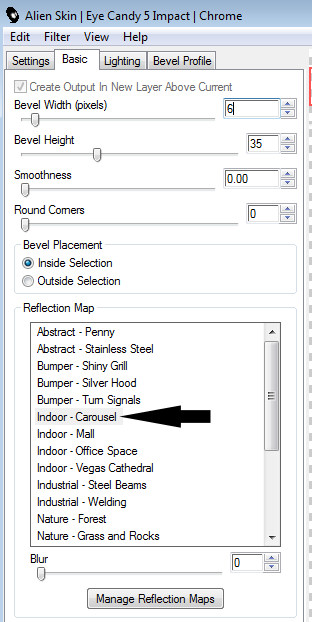
Then I wanted to make them appear to be floating high above my image so I used a Perspective Shadow...go to Effects/Plugins/Alien Skin Eye Candy 5/Impact/Perspective Shadow and use settings something like the following...

This plugin may require a little practice. There are just a couple of important things to remember when shadowing is to attempt to make your shadows appear natural and to watch closely all the areas of whatever you're shadowing. You can view all the areas by moving the little red box around at the top of the window of this plugin...
(You can tweak your shadows by moving the nodes around in the preview window. To move one node at a time hold down your CTRL key. You can move the whole shadow by holding down your right mouse button and clicking in the middle of the shadow. It's very important to think about how a shadow would be cast realistically and how dark or how light it should be. This plugin is one of my favorites and one I use with nearly every single one of my tags.)
Once you have your design the way you want it, close your background layer and hold down CTRL + SHIFT + C to copy merged, unhide the background layer and select it then paste what you just copied above it by clicking on your image and going to Paste as a new layer. Resize 103% and go to Effects/Plugins/Toadies/Blast 'em and use these settings:

Then go to Effects/Plugins/Toadies/Blur 'em and use these settings:

Above your background layer copy and paste paper 11 then grab your Selection tool set on Rectangle with a 75% feather, Select around the edges of your paper and go to Selections/Invert and hit delete a couple times for a soft feathered background. You can always tweak it with your Raster Deform tool if you don't like the size of it.
Now for your name go to Effects/Plugins/Alien Skin Eye Candy 5/Impact/Chrome and use these settings:
Then go to Adjust/Hue & Saturation/Colorize and use these settings:

Duplicate your name and go back to Colorize and use these settings:

Then grab your Selection Tool set to Rectangle with a 50% feather and select the lower portion of your name and hit delete a couple times to expose the color below...
Then merge the two together and add a pretty dark drop shadow since our palette is fairly dark...

Next add your copyright taking care that it is legal and legible.
Now we're going to prepare to add the animation by merging most of our layers together.

Close all layers above these layers here and your name and background layers, then Merge Visible. Hide the layers you just merged and unhide the closed layers except your name and background and Merge Visible again. (You don't want to merge your name if you're planning on making tags for others.)
Once you have everything merged together, you should have four layers now. Your name, top merged layers, bottom merged layers and your background. I have the habit of not merging my background with my work...you can merge the background with the bottom merged layers if you wish.
At this point, open Animation Shop (AS) by going to File/Jasc Software Products/Launch Animation Shop. Once it's open, open Lovey's animation in AS. Go back to PSP and hit CTRL + SHIFT + C to copy merged, back to AS and hit CTRL + v to paste a new animation.
You will notice Lovey's animation has 15 frames, you will need your newly pasted animation to have 15 frames as well, so click on the top of your animation and go to Duplicate Selected. Do this enough times to have 15 frames...if you duplicate it too many times, click on the extra frames and hit delete to get rid of them.
Now, on Lovey's animation, go to Edit/Select All, then click on top of the animation and go down to Copy...hit CTRL + v a few times to make you five or six copies of it. (It's a good idea to have extras in case you miss a drag.)
Very important step here to remember or you're going to cuss a lot..lol. You will notice a slider bar at the bottom of both animations...BE SURE IT IS SLID ALL THE WAY TO THE LEFT so that you are on the very first frame on both. Also, on both go to Edit/Select All so that all frames on both are selected by a blue highlight. See my image below to get an idea of approximately where you need to drag these animations into your's. You're going to need to drag three of Lovey's animations into your's...

Once you have the three in place go back to PSP. Hide the background layer, the bottom merged layers and unhide the top merged layers and your name. Hold down CTRL + SHIFT + C to copy merged and go back to AS.
Hit CTRL + v to paste a new animation, duplicate it so that you have 15 frames like you did before, be sure slider bar is all the way to the left and all frames are selected. Again, a really good idea to have extra copies....drag this over the top of the animation you've been working on until it fits in place...if you mess up just go to Edit/Undo Drag and redo.
Resize to fit your needs, save as a .gif and you're done.
Note: Slide the Quality bar all the way up for the best quality for you animation...

I hope you enjoyed my tutorial and maybe learned something to help hone your skills. Please feel free to contact me with any questions you have about any of my tutorials. And please let me know of broken links, etc.
Blessings,
Trese
No comments:
Post a Comment