

In The City
Somewhere out there on that horizon
Out beyond the neon lights
I know there must be somethin' better
but there's nowhere else in sight
It's survival in the city
When you live from day to day
City streets don't have much pity
When you're down, that's where you'll stay
In the city, oh, oh.
In the city
I was born here in the city
With my back against the wall
Nothing grows, and life ain't very pretty
No one's there to catch you when you fall
Somewhere out on that horizon
Faraway from the neon sky
I know there must be somethin' better
And I can't stay another night
In the city, oh, oh.
In the city
The Eagles
This tutorial was written by me on July 19th, 2012. Any resemblance to any other tutorial or tag is unintentional and is pure coincidence. Please do not claim my work as your own and do not post to any other website, blog or forum without permission from me. It is written with the assumption that you have a working knowledge of PSP and its components. It was written for PSP X.
I recommend that you read through this or any tutorial you are attempting before starting it so you will know what to expect and how to get organized.
As with any of my tutorials when a plugin is required, change only the settings I recommend and leave the others on the default settings.
What you will need to accomplish this tutorial is the quirky art of Joel Adams which you can purchase at Creative Design Outlet HERE. Please support the arts and DO NOT use his tubes without a license to do so. Plugins Xero, Screenworks and Eye Candy 4000. There is no scrap. This tag was done with brushes, presets and plugins...I have included the brushes in Supplies HERE for you to download. Font is Andes which you can download HERE.
Let's begin...
Open your tube into PSP and start a 650 x 460 new white image. Pick a bluish-grey color from your tube, I used #657883...then draw a large rectangle into your new image on the left or right. In your palette decrease the opacity to 70%. Go to Effects/Plugins/Screenworks and apply the Pin Hole screen and then duplicate your rectangle and mirror it. Draw another rectangle in the middle of these two and decrease its opacity to 70% and apply the Pin Hole Screen to it.
Now draw black rectangles in the middle of each of these, leaving small spaces around the edges and take their opacity to 70% as well, plus apply the same Pin Hole Screen...see example below:

Next, using my image as a reference, grab your selection tool and start drawing and clearing lines on your black rectangles. Add a slight drop shadow to each.
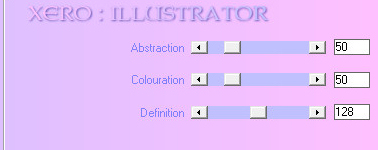
Now, on the black rectangles on the right or the left copy and paste the close up of the tube and then duplicate and mirror it. For each tube go to Effects/Plugins/Xero/Illustrator and use these settings:

Once applied to each element add a slight drop shadow to each.
Next add a new Raster Layer above your black rectangles and on each side of the middle rectangle at the very bottom apply the Floral Brush supplied and add a slight drop shadow to each. Then beneath these brushes apply the star brushes supplied and give them a slight drop shadow as well.
Now copy and paste your tube to the top of your palette and go to Effects/Plugins/Xero/Radiance and use these settings:

Then go back to Effects/Plugins/Eye Candy 4000/Corona and apply these settings:

Now you will need to use your selection tool to select and clear the lines in the same areas on your black rectangles.
At this point, copy and paste your cityscape above the background layer...be sure the edges match with the edges of your work then using your Raster Deform tool or your Pick tool, depending on which version of PSP you are using and stretch the cityscape upwards to nearly three quarters of your working palette.
Beneath the cityscape layer add a new Raster layer and name it ray brush then apply the Ray brush I supplied...you can always use your Raster Deform tool to get precise sizing and your selection tool to erase any areas your brush extends out of your working palette. Or there is always the eraser tool.
Now on the top of your Layer Palette begin to copy and paste the floral elements I supplied. If these are your elements please let me know so I can credit you in this tutorial. I got them in one of my groups from years ago. Using my image as a reference for size and placement and then on each one go to Effects/Plugins/Eye Candy 4000/Corona and use these settings:

Next add a new Raster Layer above your black rectangles and on each side of the middle rectangle at the very bottom apply the Floral Brush supplied and add a slight drop shadow to each. Then beneath these brushes apply the star brushes supplied and give them a slight drop shadow as well.
Now copy and paste your tube to the top of your palette and go to Effects/Plugins/Xero/Radiance and use these settings:

Then go back to Effects/Plugins/Eye Candy 4000/Corona and apply these settings:
At this point add a new Raster Layer above your black rectangles and apply the Light brush.
Add your name and copyright taking care that your copyright is legal and legible. For professional-looking copyright I use pixel or copy fonts...you can find plenty of them with a Google search. These fonts work best at size six and with your antialias set to off.
Resize to fit your need or preference and save as a .png or a jpeg and you're done. I appreciate you trying my tutorial and I hope you've learned something to hone your skills. Please feel free to contact me with questions about any of my tutorials or for any issues with broken links, etc.
Blessings,
Trese
No comments:
Post a Comment