
Paramour
(adulterous woman)
This tutorial was written by me on August 7th, 2012. Any resemblance to any other tutorial or tag is unintentional and is pure coincidence. Please do not claim my work as your own and do not post to any other website, blog or forum without permission from me. It is written with the assumption that you have a working knowledge of PSP and its components. It was written for PSP 9.
I recommend that you read through this or any tutorial you are attempting before starting it so you will know what to expect and how to get organized.
As with any of my tutorials when a plugin is required, change only the settings I recommend and leave the others on the default settings.
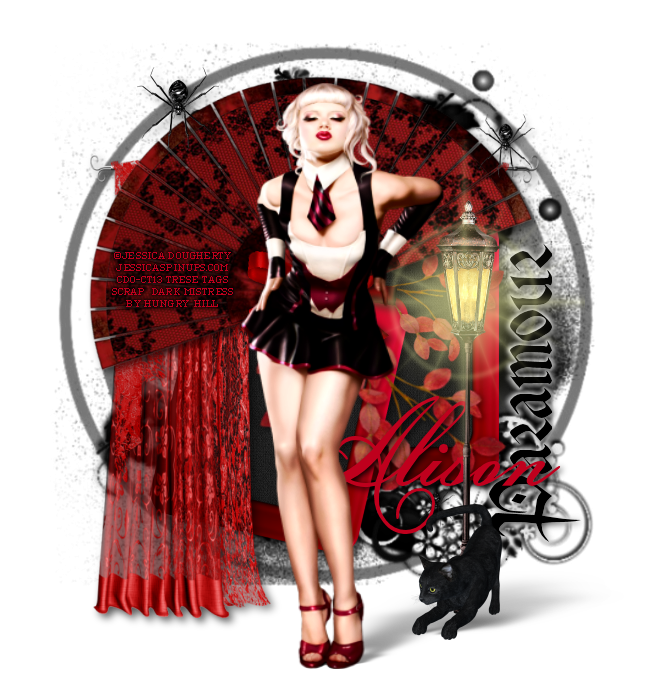
What you will need to accomplish this tutorial is this wicked kit by my amazing friend Alison aka Hungry Hill called Dark Mistress. You can purchase this kit at Creative Design Outlet HERE...thanks Ali for your talents..xoxo. You also need this sexy stunning tube by Jessica Dougherty...you can purchase HERE at Creative Design Outlet as well along with the rest of her tubes. Please support the arts and DO NOT use her tubes without a license. Plugins are Alien Skin Eye Candy 5/Impact, Xero and Eye Candy 4000. Mask is one of mine Trese Mask 0044 you can find right HERE on this blog. Brush I have provided for the flare on the lamp post HERE. Fonts are Helinda Rook and Cadeaulx.
First of all, you'll need to install your brush into your PSP...it's just a couple of simple steps. First, open the .png file I provided into PSP then go up to File/Export Custom Brush. Name your brush and hit Okay. Any brush you export into PSP this way cannot be any larger then 500 x 500.
Let's get started...
Open your tube and your elements into PSP. You can use my image as a reference for the elements I used. Now start a new 700 x 700 white image. Add a new Raster Layer and flood fill with black, resize 95% and apply your mask. Next copy and paste the fan element over your mask, resize 85% and then mirror it. It should line up with the circle inside the design...then add a slight drop shadow with these settings:

Now above your fan element copy and paste the red bow -2. Resize 25%, place it above the strings which hang from the fan and give it the same drop shadow you just used.
Next, above your mask layer copy and paste the double frame, resize it by 50% and then flip and mirror it. Give it the same drop shadow. Then below this layer copy and paste the paper of choice. I used the slate-colored paper and used my eraser tool to erase areas of the paper outside the frame.
Now, above your double frame layer copy and paste drapery 2 and resize it 80% and again apply the same drop shadow.
Next above this layer copy and paste the branch 1, resize it 50% and then flip it. Duplicate it a couple times and then randomly place each layer beneath the fan. Use my image as a reference. Give the same drop shadow.
Copy and paste the streetlight on the top of your canvas, resize it 70% and place it to the right of your work. Add a new Raster Layer and apply the brush I provided over the lights...you can use your Raster Deform tool or your Pick tool, depending on which version you're using of PSP for precise sizing. Decrease the opacity of this layer to 60%.
Add your Wordart using the Cadeaulx font, rotate it to the right 90 degrees and put it to the left of your work...use my image as reference for placement. Then go to Effects/Plugins/Eye Candy 4000/Corona and use these settings:

Now copy and paste your tube on top of your canvas, resize it 120%. Go to Adjust/Automatic Contrast Enhancement and use these settings:

Then go to Effects/Plugins/Xero/Radiance and use these settings:

Now go to Effects/Plugins/Alien Skin Eye Candy 5/Impact/Perspective Shadow and use these settings: (You can tweak your shadows by moving the nodes around in the preview window. To move one node at a time hold down your CTRL key. It's very important to think about how a shadow would be cast realistically and how dark or how light it should be. This plugin is one of my favorites and one I use with nearly every single one of my tags.)

Copy and paste your cat, resize and apply the same perspective shadow you just used. Then copy and paste the spider element...duplicate it a couple of times and place them randomly on your canvas...give each spider the same drop shadow you've been using.
Add your name and copyright and you're done. For a neat and professional-looking copyright I use pixel or copy fonts, you can google and find hundreds of these fonts. They work best at size six usually with your antialias set to off.
I'm glad you done my tutorial, I hope you gleaned something from it to hone your PSP skills. Please feel free to contact me with any questions for any of my tutorials or with issues over broken links, etc. Happy creating...
Blessings,
Trese
1 comment:
Thank you so much for this post. I want to let you know that I posted a link to your blog in CBH Digital Scrapbooking Freebies (please, notice the new url for my blog), under the Page 4 post on Aug. 08, 2012. Thanks again.
Post a Comment