
J'aime Paris
I was blessed to be able to go to Paris back in 2005. What a magical place. I will never forget being there and hope to go back again. At night the glimmering 10 minute light show is turned on every hour. At least it did when we were there. I think it depends on the seasons and of course the time of day as to when it starts and it literally glimmers.
This tutorial was written by me on February 24, 2012. Any resemblance to any other tutorial or tag is pure coincidence. Please do not claim my work as your own and certainly do not post this or any of my tutorials to any website, blog or forum without permission from me. My email is tresetags@gmail.com or you can find me on facebook by clicking on the link on the right side of this page. I wrote this tutorial with assumption that you have a working knowledge of PSP and its components. It was written for PSP 9, but should be compatible with most versions.
What you will need to accomplish this tutorial is listed below:
This beautiful kit by Hungry Hill...French White you can purchase at Creative Design Outlet HERE. Thank Ali, you've outdone yourself again.
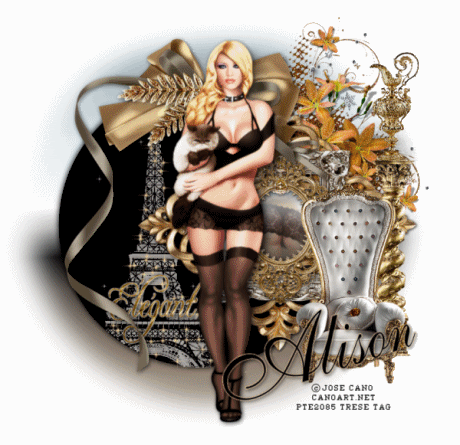
Jose Cano tubes or tubes of choice, you can purchase his tubes at PSP Tubes Emporium HERE. Please support the arts and do not use his tubes without a license.
Eiffel Tower brush, you can find Photoshop brushes HERE. You will need something to convert Photoshop brushes to .png. I recommend abr viewer, you can download it free HERE.
Star Brushes.
A pretty flower element.
Font...I used Allegro, you can get it HERE.
I recommend you read completely through this or any other tutorial before starting. You are aware of what to expect and can get better organized.
Naming your layers as you go will cut down on confusion. I highly recommend you do this for this tutorial.
Ready to get started? Good, me too...let's go.
With PSP opened, open all your elements and tubes. Use my image as a reference for what elements to use. I used three of the frames and used my raster deform tool to fit them together. The bottom frame was rotated at a 45 degree angle. Open a 750 x 750 new white image and copy and paste those three frames into it and do as I just described. Add a slight drop shadow to each frame layer and them merge them together. Drag them slightly to the right of your working image. Beneath this frames layers draw a large black circle. Deselect. Above this large black circle draw a small elipse using a silver gradient in the middle of the hole of the frame for the mirror. Above this silver gradient I copied and pasted the rear end of another tube to appear as her reflection. (Cano's Golden Girl). With your selection tool set with a 42% feather draw around the rear end. Go to Selections/Invert and hit delete.
Add the rest of your elements and tube to your working image and give them all a slight drop shadow.
Go back to the large black circle layer, using your magic wand select this circle. Add a new raster layer and apply your Eiffel Tower brush. Duplicate this layer twice for three Eiffel Tower layers. You need to name these layers Tower 1, 2 and 3. BE SURE THESE LAYERS ARE NOT MOVED ON YOUR IMAGE AT ALL. When dealing with these layers select them in your layers palette to prevent movement. Using your star brush start painting stars on each layer of the three Tower layers. These stars should be a gold color. It's helpful to start with one layer and scatter your stars, leave it open, select your next layer, paint your stars, leave it open and paint your stars on your final layer. This helps with your star placement and overlapping. Be generous with your stars on the Tower layers.
Now you need to add three blank layers on top of the Tower layers. Name them Stars 1, 2 and 3. Go back down to the large black circle and select it again with your magic wand. With all of your star layers open start scattering stars on the large black circle area. Be stingy with your stars here, just need a few. These stars need to be smaller than the Tower stars and they should be white. Go to Selections/Select none.
In your layer palette, select the large black circle. Give it a drop shadow of 2 in each offset, about 62 opacity and 12 blur. Then repeat that shadow only changing -2 for each offset.
Beneath your large black circle add a new raster layer, flood fill with silver gradient. Go up to your selection tool, set on elipse, feather set on 70%. Select around the outside areas of your black circle on this gradient layer. Then go to Selections/Invert and then hit delete.
Add name and copyright being careful to be sure your copyright is legible. On your name, be sure your antialias is set to sharp.
Now for the fun part...Animation...YAY!
When you're ready open Animation Shop. Go back to PSP and in your layer palette make sure your top two layers of stars and Tower are hidden. Hold down Ctrl + Shift and hit C (to copy), go to Animation Shop and hit Ctrl + v to paste a new image. Back to PSP. Hide the bottom layers of your stars and your Tower, unhide the middle layers of each, hit Ctrl + C and go back to Animation Shop...this time you will hit Ctrl + Shift/L to paste after current frame. Repeat this step for your last layers. Resize and save as a .gif and you're done.
I appreciate you doing my tutorial. I hope you enjoyed and learned something useful. Please feel free to contact me with any questions you may have and please let me know about any broken links.
Love and Blessings
Trese
No comments:
Post a Comment