

The Dame
A dame that knows the ropes isn't likely to get tied up.
Mae West
“They were smart and sophisticated, with an air of independence about them, and so casual about their looks and clothes and manners as to be almost slapdash. I don't know if I realized as soon as I began seeing them that they represented the wave of the future, but I do know I was drawn to them. I shared their restlessness, understood their determination to free themselves of the Victorian shackles of the pre-World War I era and find out for themselves what life was all about.”
― Colleen Moore
This tutorial was written by me on September 29th, 2012. Any resemblance to any other tutorial or tag is unintentional and is pure coincidence. Please do not claim my work as your own and do not post to any other website, blog or forum without permission from me. It is written with the assumption that you have a working knowledge of PSP and its components. It was written for PSP 9.
I recommend that you read through this or any tutorial you are attempting before starting it so you will know what to expect and how to get organized.
As with any of my tutorials when a plugin is required, change only the settings I recommend and leave the others on the default settings.
What you will need to accomplish this tutorial is the beautiful art of Maxine Gadd which you can purchase at Creative Design Outlet HERE. This stunning kit that is inspired by this very tube by the incomparable Crazy Carita. You can purchase it at Creative Design Outlet as well HERE. Please support the arts and DO NOT use Maxine's tubes without a license and please don't share her tubes or this kit. You will need my mask which can be found and downloaded right here on this blog. It's TreseMask0002 and you can find it on this page HERE. Plugins are Alien Skin Eye Candy 5/Impact, Eye Candy 4000 and Xenofex. Font is called Anastasia, you can find it HERE.
First start a new 700 x 700 white image, we'll resize in the end. Copy and paste fr2 into your new canvas and resize it 60% and then copy and paste your tube behind your frame. She should be about the right size, duplicate her and drag the duplicate above the frame in your layer palette. Use your eraser and erase the bottom of the tube to make her fit into the frame with her head sticking out of the top of it.
Next, copy and paste your choice of paper above your background layer and resize it to fit into your frame and use your eraser tool to get rid of any paper protruding outside the frame.
Go back to your top tube layer and give her a shadow that will make her pop out of that frame. It's called a Perspective shadow and you can do this by going to Effects/Plugins/Alien Skin Eye Candy 5/Impact/Perspective Shadow and use these settings:

This plugin may require a little practice. There are just a couple of important things to remember when shadowing is to attempt to make your shadows appear natural and to watch closely all the areas of whatever you're shadowing. You can view all the areas by moving the little red box around at the top of the window of this plugin...
(You can tweak your shadows by moving the nodes around in the preview window. To move one node at a time hold down your CTRL key. You can move the whole shadow by holding down your right mouse button and clicking in the middle of the shadow. It's very important to think about how a shadow would be cast realistically and how dark or how light it should be. This plugin is one of my favorites and one I use with nearly every single one of my tags.)
At this point use my image as a reference for size and placement and copy and paste the remaining elements into your canvas. You can achieve precise sizing and placement by using your Raster Deform tool. You can 'tweak' anything with this tool, it's my favorite tool. It prevents the distortion and pixelation that happens sometimes when resizing in percentages. Give each slight drop shadows and for the ones you want to have a 3D effect in any of your creations use the Perspective Shadow plugin. I used it on my butterfly and just pulled the shadow slightly below it...when something is flying it casts a shadow down below it. Think of a bird flying and the shadow it casts.
For the colorizing of the peacock feathers go to Adjust/Hue & Saturation/Colorize and use these settings:

To set up for the animation on your tube grab your Lasso tool with the following settings:

Begin selecting small areas of her headdress and necklace, like this...

For the small areas you can use your Selection tool with the same feather, set to Add. Once you have every thing selected, duplicate your tube twice for a total of three. Name the bottom layer Cons 1, the middle layer Cons 2 and the top layer Cons 3. Hide the top two layers and in your layer palette select the first one and then go to Effects/Plugins/Xenofex/Constellation and use these setting:

Hide that layer and unhide and select the middle layer and go to Effects/Constellation and use the same settings only hit the Random Seed button once. Repeat for the last layer.
Add your name...go to Effects/Plugins/Alien Skin Eye Candy 5/Impact/Chrome and use these settings:

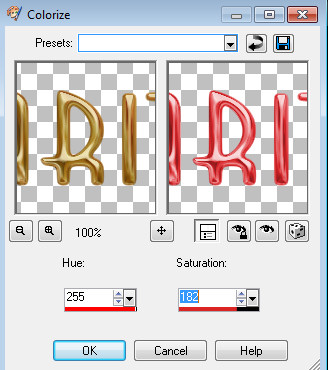
Duplicate your name and then go to Adjust/Hue & Saturation/Colorize and use these settings:
Grab your Selection tool with a feather of about 73 and Rectangle setting. Select either to top of your name and hit delete a couple times, then select the flip side and do the same. Merge the two name layers together and add a drop shadow:

Now add your copyright taking care that it is legal and legible. For a neat and professional-looking copyright I use a pixel, copy or ceriph font. You can google and find literally hundreds of these fonts. Most of them look best at size 6 with your Antialias set to Off. NOTE: for crisp edges on your normal fonts set your Antialias to Sharp.
Now let's animate and finish up. First open Animation Shop (AS) by going up to File/Jasc Software Products/Launch Animation Shop and go back to PSP. In your layer palette make sure the Cons 2 and Cons 3 are hidden. Hold down CTRL + SHIFT and hit C to copy merged. Go to AS and hold down CTRL and hit v to paste a new animation. Go back to PSP, hide Cons 1 and unhide Cons 2. Hold down CTRL + SHIFT and hit C to copy merged and go back to AS. This time hold down CTRL + SHIFT and hit L to paste after current frame. Repeat for Cons 3.

Resize to fit your preferences and go to View/Animation to check your animation. If you're happy save it as a .gif and you're done. NOTE: make sure your Image Quality if all the way to the top...

Thank you for trying my tutorial. I hope you had fun with it and maybe even learned something. Please feel free to contact me about any questions you have about any of my tutorials and please let me know of any broken links or other issues.
Blessings,
Trese
No comments:
Post a Comment